- Joined
- Jun 10, 2019
- Messages
- 1,776
- Media
- 503
- Reaction score
- 1,590
- Location
- Corona Del Mar, California
- Grill
- Timberline 850
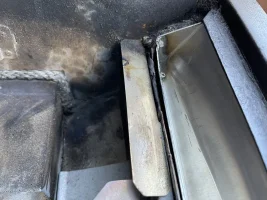
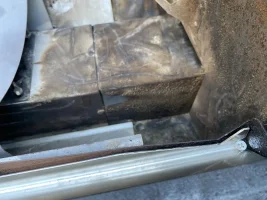
I've read several folks complaining of grease fires and poor grease drainage. I was cleaning my grill yesterday and really looked over the front drip channel to see what could be done. The front channel is pretty integral to the grill and mine clearly collects and burns most of the drippings that collects there. It "should" drain quickly to the left side, down, and out into the collection pan, most of it does NOT.
I placed a level in the channel and mine is basically level in the middle, but slopes slightly to the right on the right side (where it can't drain) and slightly to the left on the left side. This is why the grease sits and burns up here, there is not near enough slope in this pretty hot area. I was going round and round on how to fix this and here's what I came up with.
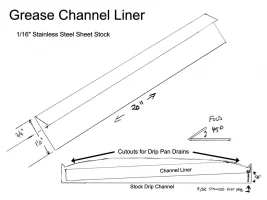
I sparked on the idea of a channel liner, something that was sturdy, thin, and removeable for cleaning. I cut up some cardboard and made some models, then sketched up a simple folded channel. I called my local sheet metal shop, emailed them the sketch, and had the part in about 2 hours, apparently they like us smokers! Their minimum charge is $50 but they dropped it to $35, well worth it if you don't have the tools to cut and bend thick metal!
This simple folded 16 gage (about 1/16" thick) stainless steel liner just drops into the front grease channel. I marked and trimmed the right side for it to be raised and clear the drip pan cut-out. Then I drilled and tapped a 8-32 stainless flat head screw on the right to act as a prop up to raise the right side about 5/8" (15mm).
The liner just drops in place, the drip pan fits normally and drains into the channel. Checking with a level shows that the slope is now very pronounced, grease will drain quickly to the left, down and out. Another plus is that this new liner is protected from direct heat by the existing grease channel around it so grease shouldn't get a chance to burn as much. I'm surprised at how stiff this channel is, very sturdy, should last a long time.
To test it I poured about 2 1/2 cups of water onto the drip tray fairly quickly and it all rushed down into the bottom tray, leaving no standing water anywhere. When I install new drip pan liners, I smash down the edge bead on the liner at both front side grease spouts so nothing pools.
All-in-all I'm super happy with this little add-on, hope it helps anyone in the same situation!
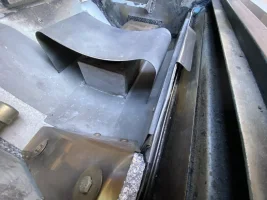
Edit, I have now added a folded 26 gage Stainless flap in the center of the drip channel, just cut with tin snips and hand folded in my vise. I tucked it in between the belly heat shield and the drip channel. This shields any drippings in the channel from the hot fire gasses that pass out the center of bowed drip pan and keeps them from burning up in the middle of the channel.
Edit, I gave away my liner to another user and went to re-create the liner. I ended up taking it further with a bit more fabrication. I had the right end capped off and made the liner a bit wider, and made the sides higher. See further posts in this thread.
I placed a level in the channel and mine is basically level in the middle, but slopes slightly to the right on the right side (where it can't drain) and slightly to the left on the left side. This is why the grease sits and burns up here, there is not near enough slope in this pretty hot area. I was going round and round on how to fix this and here's what I came up with.
I sparked on the idea of a channel liner, something that was sturdy, thin, and removeable for cleaning. I cut up some cardboard and made some models, then sketched up a simple folded channel. I called my local sheet metal shop, emailed them the sketch, and had the part in about 2 hours, apparently they like us smokers! Their minimum charge is $50 but they dropped it to $35, well worth it if you don't have the tools to cut and bend thick metal!
This simple folded 16 gage (about 1/16" thick) stainless steel liner just drops into the front grease channel. I marked and trimmed the right side for it to be raised and clear the drip pan cut-out. Then I drilled and tapped a 8-32 stainless flat head screw on the right to act as a prop up to raise the right side about 5/8" (15mm).
The liner just drops in place, the drip pan fits normally and drains into the channel. Checking with a level shows that the slope is now very pronounced, grease will drain quickly to the left, down and out. Another plus is that this new liner is protected from direct heat by the existing grease channel around it so grease shouldn't get a chance to burn as much. I'm surprised at how stiff this channel is, very sturdy, should last a long time.
To test it I poured about 2 1/2 cups of water onto the drip tray fairly quickly and it all rushed down into the bottom tray, leaving no standing water anywhere. When I install new drip pan liners, I smash down the edge bead on the liner at both front side grease spouts so nothing pools.
All-in-all I'm super happy with this little add-on, hope it helps anyone in the same situation!
Edit, I have now added a folded 26 gage Stainless flap in the center of the drip channel, just cut with tin snips and hand folded in my vise. I tucked it in between the belly heat shield and the drip channel. This shields any drippings in the channel from the hot fire gasses that pass out the center of bowed drip pan and keeps them from burning up in the middle of the channel.
Edit, I gave away my liner to another user and went to re-create the liner. I ended up taking it further with a bit more fabrication. I had the right end capped off and made the liner a bit wider, and made the sides higher. See further posts in this thread.
Attachments
-
 Stock channel center was almost level grease just burned here.webp117.3 KB · Views: 4,290
 -
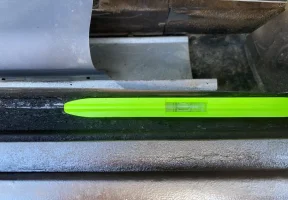 Stock grease channel right side had reverse tilt that would not drain.webp156 KB · Views: 322
 -
 20in channel liner.webp70.1 KB · Views: 314
 -
 Right Side of Liner Trimmed with 8-32 prop up screw installed.webp61.2 KB · Views: 315
 -
 Right side of liner is raised 15mm with stainless screw and trimmed for drip pan clearance.webp130.2 KB · Views: 316
 -
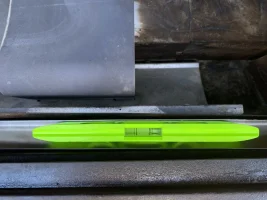 Much improved angle for fast grease draining to lower pan.webp124.6 KB · Views: 332
 -
 Channel Liner Sketch.webp47.8 KB · Views: 337
 -
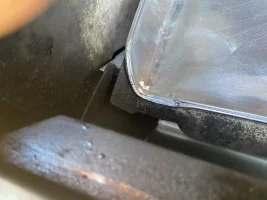 Drip Pan Installed Left Side.webp127 KB · Views: 324
 -
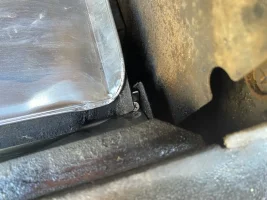 Drip Pan installed Right Side.webp159.4 KB · Views: 320
 -
 IMG_8222.webp110.8 KB · Views: 321
Last edited: