Traeger Pro 780 + Smoke Daddy Magnum PIG cold smoke generator = HEAVEN

DJDDay

Active member
Joined
Jan 3, 2022
Messages
96
Reaction score
109
Points
33
Location
Northeast USA
Grill
Pro 780
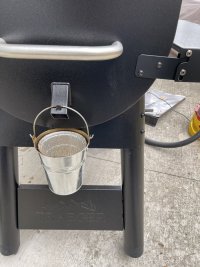
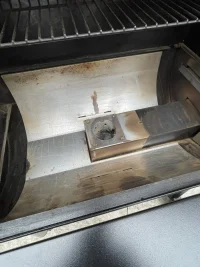
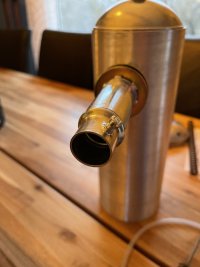
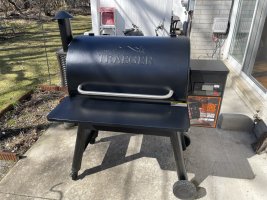
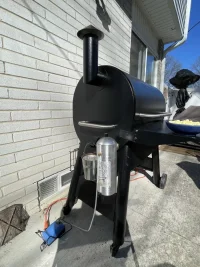
Full disclosure: This will be a pretty comprehensive review that will be updated over the coming year as I gain more experience using it. I bought the Smoke Daddy Magnum PIG to modify my Traeger Pro 780, which is a fantastic pellet grill and highly recommended - that offers little to no smoke "flavor" out of the box by itself. Having come from a Kamado-style smoker (and prior to that, a stick burner), I began to miss that heavier "bacon-like" smoke that you can only get from burning actual wood stick/chunks/chips. Did a lot of research and in the US at least, the Smoke Daddy line of cold smoke generators seemed to be the best bet. They've been on the market for well over a decade, is still ran by a family business based out of Gurnee, Illinois, have a large community of users who have perfected the do's and don'ts while using it, and it seems fairly well machined. Additionally, it appears that their patented design utilizes the Venturi effect the most efficiently by placing the oxygen intake and smoke outtake tubes at the top of the combustion chamber, while allowing the wood combustion to happen at the bottom as gravity draws the embers down. Smoke wants to rise naturally, as it is (usually) lighter than the surrounding air, so the designs that draw from the bottom don't appear to work as well as this IMHO. Other cold smoke generators that I considered was the popular Bella’s as well as the Smokai – both of which have their Venturi effect drawn at the bottom of the chamber with combustion happening above. Bella’s was too large/awkward to fit on the Traeger Pro 780, and Smokai wouldn’t answer my email requests for product info, so they lost a potential customer. By contrast, Smoke Daddy answered the phone almost immediately and answered my questions – just a real nice bunch of people.

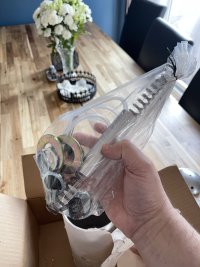
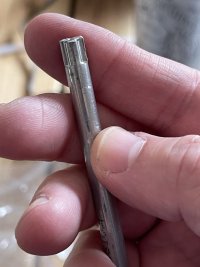
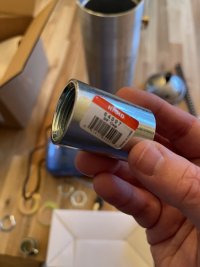
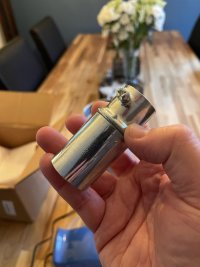
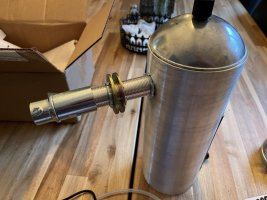
I chose to buy from Amazon because I wanted this overnight, and buying direct from Smoke Daddy was noticeably more expensive. They've had a distribution agreement with Amazon for some time, so it's covered via their warranty regardless. First, let's get into the quality of the parts: these are all fairly well machined (mostly anodized aluminum) parts. While others have said "I can just build this myself out of stock fence parts", I neither possess the tool and die skills nor the wherewithal to craft something like this by myself, so for me - to pay to have someone to do this for me, package it, and cover it with an alleged lifetime warranty, it only makes sense to buy it premade. That said, for those potential buyers who worry about where their products are made or sourced, know that Smoke Daddy now sources many parts from China these days. Both combustion chamber caps (top and bottom) were made in China, so there's "that". But, with "that" out of the way, the parts seem decent. The actual metal Venturi tube was stamped "Kaiser Aluminum", and a little Internet research indicates that this is an American company based out of Lake Forest, California. They've provided aluminum parts to the aerospace, packaging, automotive, and other markets for well over 70 years. The other parts (external threaded aluminum main chamber smoke tube, the conduit bolts, washers, etc) - no clear idea where they're from. Same for the main combustion chamber. So, most likely China. :ROFLMAO:

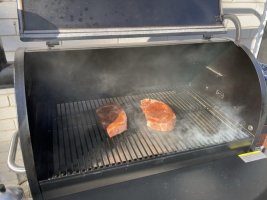
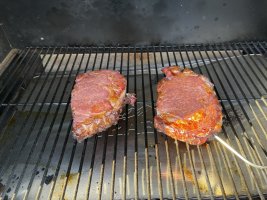
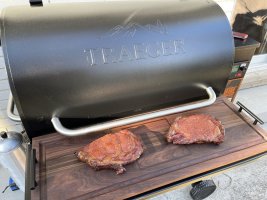
The provided fish-aquarium style adjustable air pump does indeed do the job, but be aware - this is yet another part sourced in bulk from China (they're all over Alibaba for $1.50 USD - $5 if bought in bulk). Translation: these are extremely cheap air pumps. As far as noise, on low it's pretty quiet - over the noise that my Traeger Pro 780's convection fan makes, it's inaudible. Crank it up to the 50% mark, and things start to get noticeably louder. On 100% high, it's very noisy, but again - assuming you're doing a hot cook with your pellet grill's fan running, you may or may not even notice it. For a cold smoke with the grill off, you will absolutely hear it purring away if it’s on high, but I ran mine between 50%-70% during an initial “cold smoke” of my thick ribeye steaks prior to grilling.
 

Attachments

  • IMG_7148.JPEG
    IMG_7148.JPEG
    202.3 KB · Views: 1,473
  • IMG_7149.JPEG
    IMG_7149.JPEG
    153.4 KB · Views: 146
  • IMG_7150.JPEG
    IMG_7150.JPEG
    111.9 KB · Views: 141
  • IMG_7151.JPEG
    IMG_7151.JPEG
    119.4 KB · Views: 143
  • IMG_7152.JPEG
    IMG_7152.JPEG
    124.2 KB · Views: 140
  • IMG_7153.JPEG
    IMG_7153.JPEG
    142.1 KB · Views: 139
  • IMG_7155.JPEG
    IMG_7155.JPEG
    181.4 KB · Views: 149
  • IMG_7154.JPEG
    IMG_7154.JPEG
    157.7 KB · Views: 162
  • IMG_7157.JPEG
    IMG_7157.JPEG
    97.4 KB · Views: 163
  • IMG_7158.JPEG
    IMG_7158.JPEG
    93 KB · Views: 165
Last edited:
As for mounting it, I really REALLY wanted to mount from my pellet hopper side, as my smoke chimney is on the opposite side, but due to the sheer size of the Magnum PIG, there was just no way that this could be done. If I placed it on the rear hopper side, I'd block the pellet cleanout chute. If I placed it on the front hopper side, it would be dangerously close to my Traeger's electronics, and make no mistake - the Smoke Daddy Magnum PIG (and all of their other sizes) get insanely hot, radiate intense heat, and cannot be touched while in use - these are all essentially uninsulated small stick burner chambers. So placing something that will reach surface temps of 699F - 800F that close to my $1000 USD Wifi controller did not sit well with me. Additionally, on the Traeger Pro 780, the hopper side has two layers of metal that would need to be cut through - the thick external drum steel and a thinner interior heat deflector steel (this double wall keeps this side of the barrel temps lower since it's so close to the pellet hopper and electronics). Sooooo... my options were the chimney side where the grease chute is located. Because the smoke exhaust tube will be located directly below the actual barrel chimney, this concerned me as to how much smoke would escape from the barrel on this side without really permeating proteins that may be closer to the center of my grates, or towards the hopper side of the grates. So, I added a smoke exhaust “extension” tube that is long enough to stretch all the way across the chimney side where it enters, to the pellet hopper side where I really wanted it to go in the first place. This was done relatively inexpensive by using 3 / 4 ” electrical conduit pipe joined by a $3 coupling (I cut the electrical conduit pipe to about 25”, which brought it right where I wanted it). And for those electricians out there freaking out about the poly coating on the inside of the conduit pipe, know that I ran an initial burn at 500F for about an hour to burn off anything that was on the inside.

My main fear was cutting a hole into my $1000 USD Traeger Pro 780 (that was barely 3 months old), and getting it in the wrong spot. But after some careful eye-balling, I was successful. For those less inclined to eye-ball, just measure and use math! Here’s where your basic grade school geometry comes into use. Lol! I didn’t want to run it so low that it was next to my burn pot, and wanted to keep it on the outside of the heat shield. IMHO, where I mounted it is literally the ONLY place potential Pro 780 owners should considering mounting the Magnum PIG. As mentioned earlier, the pellet hopper side is not optimal, and on the chimney side, your choices are towards the back or towards the front. I opted for towards the front since that is where I spend most of my time cooking, and it makes refilling and checking the Smoke Daddy Magnum PIG’s chip level easy, as well as stoking the chips when needed. Speaking of which, I used some lump charcoal over a natural charcoal lighter cube to get my bed of coals going. After the lump charcoal started to ash over, I filled the chamber up about 50% with wood chips (used some apple, but only because that’s all I had on hand at the time). I initially cold-smoked (grill off) a couple of thick cut ribeye’s for about 1 hour, then started the grill up at 170F (with the barrel door open initially, but closed it after the Traeger fired up and started coming to temp) and hot smoked them for another 40-minutes. Cranked my Pro 780 up to 375F to finish them off for about 15-20 minutes, for a total cook time of about 2 hours.

The results where MAGICAL. Never have I tasted such a woody-smoke-infused steak (not acrid, mind you) from a Traeger – it gave me that familiar “bacon-like” smoke I missed from my stick burner days. Please note that the video in this review shows the Smoke Daddy when I first fired it up – the smoke during my actual cold/hot smoke was thinner and “whispy”, but not like the thin smoke that pellet grill owners complain about. It was perfect.

Observations: if you’ve grown used to the convenience and speed at using a pellet grill, especially for the shutdown (I would usually shut my Pro 780 down after a cook and it would be so cold I could put the cover back on within 20-25 minutes), be prepared to wait. The Smoke Daddy Magnum PIG takes at minimum 1 hour to 90 minutes to cool down, and that’s if you remember to choke off all of the air intakes first. The bottom ash cap has air vents in it, so I had to line that with thick aluminum foil afterwards to choke off the remaining embers. Then I realized it was drawing air in from the smoke outtake tube in front of the Venturi tube, so I ended up stuffing some foil in the smoke tube exhaust from inside the Magnum PIG. About 90 minutes later, it was finally cool enough for me to put the Traeger cover on. This is a small inconvenience for a massive benefit, which is amazing smoke flavor on your pellet grill again.

Cleanup: I’m a lazy sod, so all I did was take the included wire brush and clean off the creosote from the Venturi tube, as well as scrape off some creosote that had formed dripping down from where the smoke exits via the main exhaust tube. I didn’t empty the spent embers and will deal with it the next time I fire up the grill.

Overall impression: very, VERY, satisfied with my initial cook. There’s a bit of a learning curve – for me, when doing a cold smoke, running the pump on its lowest setting seemed to provide plenty of smoke into the Pro 780 barrel. When I was running the Pro 780 for a hot cook, I had to crank the air pump up to 55% minimum just to overtake the Traeger’s own convection fan, otherwise it was blowing smoke out of the Magnum PIG’s top lid around the edge. It seems like 70%-100% is the sweet spot, though you will burn through wood chips a lot faster with it on high. Smoke Daddy claims up to 4 hours of smoke. I’m going to assume that’s on the air pumps lowest setting running a 100% cold smoke. Running at 70%-100% air pump, you’ll probably get half that time, so plan on filling up the chamber and stoking those embers on occasion. That said, I only used smaller wood chips. I may try switching to some thicker chunks of wood mixed in with the smaller chips. I will never put pellets in the Smoke Daddy Magnum PIG. EVER.

I highly recommend the Smoke Daddy Magnum PIG for the Treager Pro 780. They are a match made in heaven, and frankly, it’s the only way I can imagine ever cooking on a pellet grill ever again. YMMV, because if you don’t like a thick smoke flavor in your meats, then you should pass. For me (and my family), they loved it.

* EDIT (12-6-2022) - I have since abandoned using the 3 / 4 ” electrical conduit pipe extension tube and only use the small/short coupling that comes into the side. The extension tube is not needed - smoke permeates the entire barrel without it. So, save you money and effort and just use the stock Smoke Daddy Magnum PIG parts regardless of which side you mount it on!
 

Attachments

  • IMG_7159.JPEG
    IMG_7159.JPEG
    134.6 KB · Views: 302
  • IMG_7160.JPEG
    IMG_7160.JPEG
    103.1 KB · Views: 256
  • IMG_7161.JPEG
    IMG_7161.JPEG
    130.3 KB · Views: 260
  • IMG_7169.JPEG
    IMG_7169.JPEG
    242.1 KB · Views: 283
  • IMG_7170.JPEG
    IMG_7170.JPEG
    185.4 KB · Views: 287
  • IMG_7171.JPEG
    IMG_7171.JPEG
    197 KB · Views: 282
  • IMG_7173.JPEG
    IMG_7173.JPEG
    190.5 KB · Views: 282
  • IMG_7174.JPEG
    IMG_7174.JPEG
    244.5 KB · Views: 280
  • IMG_7175.JPEG
    IMG_7175.JPEG
    174.8 KB · Views: 308
  • IMG_7178.JPEG
    IMG_7178.JPEG
    150.5 KB · Views: 307
Last edited:
More photos....
 

Attachments

  • IMG_7180.JPEG
    IMG_7180.JPEG
    209.9 KB · Views: 271
  • IMG_7181.JPEG
    IMG_7181.JPEG
    172.7 KB · Views: 246
  • IMG_7196.JPEG
    IMG_7196.JPEG
    108.2 KB · Views: 241
  • IMG_7197.JPEG
    IMG_7197.JPEG
    109.2 KB · Views: 231
  • IMG_7198.JPEG
    IMG_7198.JPEG
    113 KB · Views: 238
  • IMG_7199.JPEG
    IMG_7199.JPEG
    152.7 KB · Views: 240
  • IMG_7200.JPEG
    IMG_7200.JPEG
    102.5 KB · Views: 263
  • IMG_7208.JPEG
    IMG_7208.JPEG
    284.7 KB · Views: 271
  • IMG_7209.JPEG
    IMG_7209.JPEG
    243.4 KB · Views: 285
  • IMG_7210.JPEG
    IMG_7210.JPEG
    205.6 KB · Views: 276
And more...

* EDIT - UPDATE (12-6-2022): as mentioned above, I have since stopped using the 3 / 4 ” electrical conduit pipe extension - it's not needed. Smoke permeates the entire barrel without this.
 

Attachments

  • IMG_7213.JPEG
    IMG_7213.JPEG
    137 KB · Views: 257
  • IMG_7214.JPEG
    IMG_7214.JPEG
    165.1 KB · Views: 226
  • IMG_7215.JPEG
    IMG_7215.JPEG
    266.4 KB · Views: 226
  • IMG_7216.JPEG
    IMG_7216.JPEG
    130.5 KB · Views: 227
  • IMG_7217.JPEG
    IMG_7217.JPEG
    186.8 KB · Views: 247
  • IMG_7218.JPEG
    IMG_7218.JPEG
    221.7 KB · Views: 253
  • IMG_7219.JPEG
    IMG_7219.JPEG
    204.1 KB · Views: 248
  • IMG_7220.JPEG
    IMG_7220.JPEG
    192.5 KB · Views: 268
  • IMG_7221.JPEG
    IMG_7221.JPEG
    236.6 KB · Views: 281
  • IMG_7223.JPEG
    IMG_7223.JPEG
    147.9 KB · Views: 283
Last edited:
And the rest....
 

Attachments

  • IMG_7229.JPEG
    IMG_7229.JPEG
    217.2 KB · Views: 260
  • IMG_7230.JPEG
    IMG_7230.JPEG
    280.2 KB · Views: 250
  • IMG_7231.JPEG
    IMG_7231.JPEG
    146 KB · Views: 243
  • IMG_7234.JPEG
    IMG_7234.JPEG
    214.7 KB · Views: 204
  • IMG_7235.JPEG
    IMG_7235.JPEG
    237.6 KB · Views: 190
  • IMG_7236.JPEG
    IMG_7236.JPEG
    265 KB · Views: 190
  • IMG_7237.JPEG
    IMG_7237.JPEG
    237.1 KB · Views: 189
  • IMG_7238.JPEG
    IMG_7238.JPEG
    97.3 KB · Views: 213
  • IMG_7239.JPEG
    IMG_7239.JPEG
    108.9 KB · Views: 221
Let's see if this video works here (it's a little large). Note that this is right after the initial lighting - the smoke quality improved a few minutes later... It's also running a cold smoke with the grill off. When the grill was running, I had to crank my air pump to above 55% for it to overtake the Pro 780's convection fan.


Man.. over 130 views since I posted this, yet no one seems interested. Color me surprised! :ROFLMAO:
 
Man.. over 130 views since I posted this, yet no one seems interested. Color me surprised! :ROFLMAO:
Nice write up, and well documented instructions with pictures
It is just not something I would consider doing.
Not sure if no one is interested 🤔. Like othe mods, the expensive ones have a limited audience.
 
Nice write up, and well documented instructions with pictures
It is just not something I would consider doing.
Not sure if no one is interested 🤔. Like othe mods, the expensive ones have a limited audience.

Thanks! And yeah, I hear you. This mod cost slightly north of $200 USD when all is said and done, and I know that might be a high cost of entry for many. I just love having that stick-burner quality smoke again, and this pretty much addresses any and all issues I had with my Pro 780 (my first issue was the lack of a proper gasket for the lap over lid barrel door; the second issue the lack of a pellet level sensor). Both of those I addressed, so now that I have an awesome smoke generator, it's just perfect. Being able to cold-smoke some thinner steaks for a while before even firing up the grill has given my steaks a whole new flavor!
 
I found it most interesting and the length of time you spent explaining the process is impressive. My only concern was the colour of the smoke looked dark. I always thought we were after a nice bluey colour when smoking, unless the vid didn't do the smoke justice.
 
I found it most interesting and the length of time you spent explaining the process is impressive. My only concern was the colour of the smoke looked dark. I always thought we were after a nice bluey colour when smoking, unless the vid didn't do the smoke justice.

In the same post as the video, I mentioned that the smoke you’re seeing was right after I lit the chamber and threw wood chips down. The quality of smoke improved a great deal about 10-15 minutes later, which is when I put my steaks down. The end result was a divine smoke infusion. Not acrid at all.
 
I like this mod as I am constantly looking to make improvements. I might consider doing this either this summer or next year and looking to support Smoke Daddy since they are 'technicially' my neighbors in ILL.

Thanks for sharing and keep it coming. I might bug you then once I do the jump.
 
Thanks for sharing and keep it coming. I might bug you then once I do the jump.

Strongly encourage doing this mod ASAP if you like actual smoke flavor - the difference between my Traeger's cooks before and after the mod are incredible. I'm excited to try actually cold smoking as well, but where I'm at the summers tend to get pretty warm (average in the mid-80's to low 90's and humid), so I won't be able to do cheeses, etc unless it's early spring or late fall (or the winter). But in the meantime, adding true smoke to my long cooks (brisket and pulled pork, I'm looking at you!) but as well as things we'd normally deem as a "quick grill" like thinner steaks and burgers, it's just fantastic. Best $200 I spent on my Traeger.
 
Thanks for sharing.

My kids gave me a smoke daddy PIG as a birthday gift last fall.

I've used it a few times on my BGE. twice cold smoking, and a couple of times to add pecan smoke to a tri tip cook, and it worked very well.

I've been trying to decide if I want to drill into my Pit Boss 820, or modify an extra Genesis Silver B propane grill I have.

I'll keep an eye on your updates.

Thanks again.
 
I've been trying to decide if I want to drill into my Pit Boss 820, or modify an extra Genesis Silver B propane grill I have.

The Pit Boss 820 seems to have even less room on the pellet hopper side than my Traeger pro 780 does (the PIG should enter below your grate level), so if you did install your PIG on that, you'd need to do it on the chimney side like I did on mine, very likely. That said, you probably won't even need to add the extension pipe like I did. In retrospect, I probably don't even need it on mine, but I really wanted the smoke to spend some time in the barrel before exiting the chimney. Turns out - it has no problem doing that! Lol

Just not sure if that side shelf will preset a problem for you:

pit_boss.JPG


Though there does seem to be a little room above mine:

IMG_7221.JPEG
 
Last edited:
Back
Top